Wednesday, February 20, 2008

Recommended photography skills books

There are 2 books I recommend folks read to understand the basics of photography and using their Canon DSLR. The first book is Dennis Curtin's 'short course on photography using Canon DSLRs', the second book is your camera manual. Dennis' short courses on photography explain the basics of photography, inluding exposure, shutter-speed, aperture, depth-of-field, etc. but do so with examples specific to the model of camera you have. This is my #1 recommended accessory for your Canon DSLR. Buy and read this book before you invest in more camera gear - learn how to use the amazing capabilities of the Canon DSLR you own. This blog assumes the reader has a basic understanding of photography and is designed to 'start' where these 2 books end. My blog is about taking your basic knowledge of photography and your camera and applying these principals to making great photos. I recommend reading Dennis' 'short course on photography' first, then doing a lot of practicing, and then reading your camera manual. Dennis has different versions of this book for each model of Canon DSLR. Here are links to the various 'flavors' of Dennis' book on Amazon.com:

A Short Course in Canon EOS Digital Rebel XT/350D Photography (Book & eBook)

A Short Course in Canon EOS Digital Rebel XTi/400D Photography book/ebook

Sunday, February 17, 2008

Ok - but all your photos are with 5D!

Ok - so I imagine there a some readers out there thinking -- these are some 'cool photos', but Clint is shooting with a 5D -- I've got a Rebel XT, Rebel XTi, 20D, 30D, 40D, etc. First of all, I do love my 5D, it's the best camera I have ever owned, but with that being said I could make 98% of the photos in my portfolio with a Rebel XTi. I might use a different lens on a crop-sensor body than on a full-frame body, becauses of differences in effective focal lengths, but I could get the same shot. The only exception to this would be the shallower depth of field possible with the larger full-frame sensor of the 5D, and even then the difference would not be massive, you can still get a nice 'blurry background' with a crop-sensor body. Keep in mind that there are also benefits of a crop-sensor body over a full-frame body, including an effective 1.6X telephoto factor, smaller/ligher body, lower purchase price and a built-in flash.

Creating cool light trails

Canon 5D, 50mm f1.4 lens, manual exposure of 2.5 second @ f1.6, ISO 400, external flash

Here is another one of my favorite shots of Sawyer. We were sitting on the beach with a great bonfire going and the kids were putting sticks into the fire and then swinging them through the air. I had my camera handy so I figured I'd see if I could make a neat photo out of the action (bearing in mind, it was pitch black out.)

So, I mounted my 50mm f1.4 lens (the lens in my bag the best light gathering capability -- because of it's wide f1.4 aperture). I set the aperture to F1.6 (this lens is 'soft' @ 1.4 - it isn't even very sharp at f1.6, but I was choosing 'gather more light' over 'be razor sharp.) I set the ISO to 400. I used the focus assist feature of my external flash so the camera could focus in the darkness (I originally had the flash set to 'not fire', as the picture I was trying to capture was just the light trail.) I played around with the shutter-speed, eventually deciding that I liked 2.5 seconds (using manual exposure [f1.6, 2.5 seconds.]) This was very much a 'trial and error' process. This combination gave me a great light trail, but I couldn't see Sawyer in the picture at all - just the light trail. So, I thought "I'll use the flash to light Sawyer". I left the manual exposure settings @ f1.6, 2.5 second but turned on the flash and this gave me the exact same 'light trail', but Sawyer was now lit - this made me feel like a photography genius. The default flash settings over-exposed Sawyer, so I tweaked the flash exposure compensation, ending-up with a -1/3 flash exposure compensation. I did also tilt the external flash up about 30 degrees, so the flash didn't 'light-up' so much of the beach. The shot was done hand-held (the flash is what 'freezes' the Sawyer in the photo.) It took about 30 frames before I found the combination of settings that produced this type of photo. I then had to take about 30 more frames to get some 'good' light trails. So it's very much a trail and error process, looking at each image you capture and adjusting 1 setting at a time until you get the image you want. Knowing what to tweak to change the aimge you capture does require an understanding of shutter-speed, aperture, ISO and basic lighting.

Technical details:
  • Lens: Canon 50mm f1.4. I needed a lens that could gather as much light as possible, given it was pitch dark out.
  • Manual Exposure: I used manual exposure for this photo because I wanted 100% control over both the aperture and the shutter-speed.
  • Aperture: f1.6. Given it was pitch-dark out, I wanted an aperture that let in lots of light. The 50 f1.4 produces soft images from f1.4 to f2.0 - I choose f1.6 becuase 'light gathering' was more important that absolute image sharpness.
  • Shutter-speed: 2.5 seconds. Leaving the shutter open for this long is what creates the long light trail.
  • ISO: 400. Higher ISO speed increases the sensitivity of the sensor to light - in essense allowing the sensor to gather more light. But, higher ISO's also have more noise. ISO 400 gave me the balance of gather lots of light - without introducing any noise. In addition, I didn't want to gather 'too much light' as I wanted to keep a black background (at ISO 1600 I saw too much background which cluttered the image.)
  • Flash: I did use my external EX-420 flash for both 'flash assist' (this throws a pattern of red grid-lines on the subject to assist the camera's auto-focus system) and to light the subject. The flash is what illuminates Sawyer in the picture - without the flash all you would see is the light trail. I tilted the flash 'up' 30 degrees, which caused the flash to light the subject, but not the ground.
  • Flash Expsoure Compensation: -1/3. Without any flash compensation, the flash power was too high and Sawyer was over-exposed.

Here are a couple other photos from the evening:

Canon 5D, 50mm f1.4 lens, manual exposure of 2.5 second @ f1.8, ISO 400, external flash


Canon 5D, 50mm f1.4 lens, manual exposure of 2.5 second @ f1.8, ISO 400, external flash

Saturday, February 16, 2008

$3 for 18" x 12" archival photographic prints!

I sold my 19" x 13" Canon ink-jet printer years ago. Although ink-jet printing is very convenient, tons of fun and produces gorgeous enlargements, it costs a fortune for the paper and inks. After trying a number of print services, I now use Costco for enlargements in the 7" x 5" to 18" x 12" range. The print quality at Costco is the best of all the services I've tried and it's only $3 for a 18" x 12". This is an amazing deal. The cost per enlargement is less expensive than printing at home without the hassle of 'clogged heads', banding, print head cleaning, etc. With Costco I can upload from home and pick them up when I go grocery shopping. Perfect color and an archival quality photographic print.

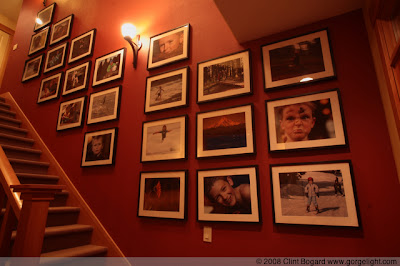
I frame my Costco 18" x 12"'s in a black Ikea Ribba frame ($15.) The Ribba frame includes a matt and glass. The frame is solid wood and the glass is glass (not plastic.) The matt opening is 15 4/3" x 11 3/4" - so the Costco prints fit perfectly with a little room for cropping on long axis. So, for about $18 I have a framed 18" x 12" photo. I'm pretty proud of this little system - I have about 50 prints on my walls using this combo (Costco print + Ikea frame.)


Getting that 'blurry-background'

One of my favorite picture styles is the portrait photo with the 'blurry' background -- see below for some examples:

Canon 5D, Canon 200mm L f2.8, Mode: Av, f2.8, 1/640, ISO 400

Canon 5D, Canon 200mm L f2.8, Mode: Av, f2.8, 1/2000, ISO 100, -1/3 EC

Canon 5D, Canon 400mm L f5.6, Mode: Av, Aperture: f5.6, 1/800, ISO 400, -1/3 EC

The blurry background is really a result of 'shallow depth of field'. The following all contribute to shallow depth of field:
  • Focal length: The longer the focal length, the shallower the depth of field.
  • Aperture: the wider the aperture (smaller number), the shallower the depth of field.
  • Distance to subject: The closer you are to the subject the shallower the depth of field.
The other contributing factor to 'blurry background' is the distance from the subject to the background, the greater this distance, the 'blurrier' the background.

So, the 'tricks' are use longer focal lengths, get as close to your subject as possible, shoot in Av 'wide open' (the widest aperture the lens supports) and position yourself so there is maximum distance between your subject and the background.

Be aware some lenses (particularly low quality zooms) deliver poor sharpness wide-open. Prime lenses and quality zoom lenses lend themselves to this photo style very well. You need a lens that is relatively sharp at wide apertures.

Remember, backgrounds do matter, position yourself for the best possible background. This will make or break the photo.

These examples really show off the shallow depth of field possible with a full frame camera (Canon 5D) and fast, high-quality telephoto prime lenses. With a 'crop-sensor' camera (using the same lens) you would have 1.6X less 'blurry background.'

Good portrait & good sunset


I'm a little embarassed to tell you that it's taken me a number of years to figure out how to get this shot. I used to either get a nice sunset with a siloutte of the subject, or the subject was well lit and you couldn't see any color in the sunset. The trick is to first get the 'perfect sunset' picture and the just turn-on the flash to light your subject. In this case I shot ISO 100, program mode [1/60, f4.5] and dialed in -1/3 stop of exposure compensation (EC) to get a good 'sunset' picture. The meter usually wants to make the scene brighter than it is, so you you need to dial in this negative EC. It usually takes a little trial and error to get the exposure just right. Once I had a good sunset photo, all I had to do was turn-on my external flash and voila! This was shot on Canon 5D at 22mm -- this 'wide angle' perspective allows you to see a lot of the sky. In summary:
  • Use a wide angle lens to include the sky in the photo (20mm - 29mm)
  • Program mode should work fine.
  • I used ISO 100 for this shot, if you're not getting fast enough shutter-speed, crank-up the ISO to 400.
  • First use trial and error to get the perfect settings for the sunset photo (use negative exposure compensation if needed.)
  • Use your flash to light the subject (use negative flash exposure compensation if needed.)'
  • Don't mess around with the camera too much - or you'll miss the sunset!

Conveying motion


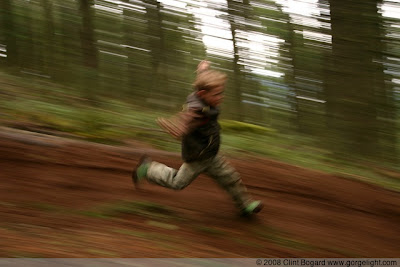
Ok, here is one of my favorite pictures of my son Sawyer. You'll be hard-pressed to get this photo shooting in 'auto'. The basic idea is that you want to use a slow shutter-speed and track the subject with the camera, this will give you a relatively sharp subject with a motion blurred background. You'll probably need to try this shot 4-6 times to get 'just the right shot'. Here are some more details on how I got his shot:
  • Shooting mode: Tv - this let me choose the shutter-speed (slow) and the camera selected the correct aperture automatically.
  • Shutter-speed: 1/20th of a second. After experimenting, I found this shutter-speed gave me the best combination of 'subject in focus' and motion blur inthe background.
  • Focal length: 30mm. You want to use a pretty wide lens - this allows you to be closer to the subject. The closer to the subject the more motion you will generate tracking the subject -- and the more motion blur you will create.
  • Exposure compensation (EC): I dialed-in -1 stop of exposure compensation. The woods were dark and the meter wanted to try and make them 'bright'. EC told them camera to under-exposure by 1 stop.
  • white balance: I set the white-balance to 'shade' because I was in the shade.
  • No flash.
  • ISO 100
  • Shooting mode: single shot (continuous shooting would have been a good idea.)
  • Camera: Canon 5D
  • Lens: Canon 17-40 L f4

My photography

I figure I should show you my photographs -- so you can determine if I'm a guy you want to listen to regarding 'making great photos'. So, here's my website. For those of you not wanting to go to a separate web page, I'm posting 5 of my favorites photos below:


In future posts, I'll explain in detail how I made each of these photos. None of these would be possible using 'full auto' :)

What's this blog about?

This blog is about making great photographs with your Canon Digital SLR. This blog is written for the beginner/intermediate photographer looking to move from 'full auto' to controlling the camera to create the images you want. I'll spend a little time on equipment (because I am a camera geek and I can't help myself), but this Blog will be more about creating emotionally compelling photographs. The more interactive this is, the more valuable I think the blog will be, so go ahead, let me know what you want to talk about. Since this is a photo blog, I'm posting one of my favorite photos: